I talked about building a mobile app in two days with AI’s assistance. In this article I detailed how one shared codebase can ship an app to both Google Play and the App Store from a Windows laptop, with an AI assistant doing much of the coding, writing and troubleshooting. This guide is the end-to-end process used to take a real app from idea to both stores, and to ship updates after.
- Code: Kotlin Multiplatform (KMP) + Compose Multiplatform: one
sharedmodule for screens, data and logic - Android build: Android Studio on Windows or Mac, signed App Bundle (.aab)
- iOS build: Codemagic cloud Macs, triggered from GitHub
- Source control: A private GitHub repository, release branch
master - Content (optional): Your website’s API, for example WordPress REST
- Stores: Google Play Console, App Store Connect + TestFlight
- AI assistant: An AI coding and writing assistant (Claude was used here) with access to the repository
The flow at a glance
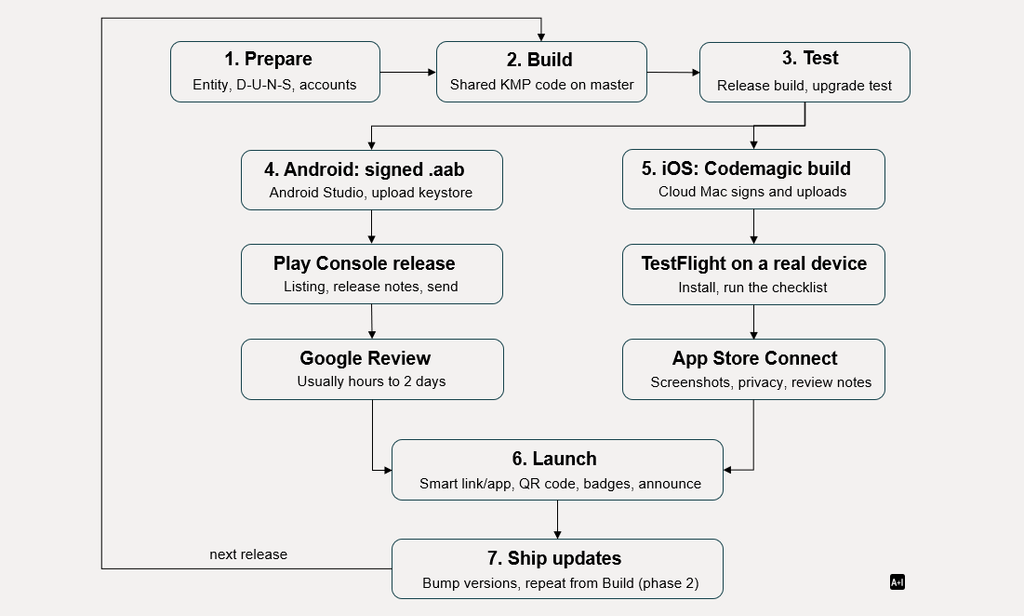
Both stores share phases 1–3 and 6–7; only building and review split by platform. If Apple asks for more information, update the review notes and resubmit without a new build.
How AI was used across the flow
An AI assistant did most of the coding, configuration, writing and diagnosis; the human owned the accounts, secrets, decisions, device testing and every final submit. Treat the AI as a fast senior engineer and copywriter who works through you, not around you.
- 1 Prepare
- AI: Explained store requirements, D-U-N-S and enrolment steps; compared build options (Android-only, KMP, other cross-platform) and recommended KMP + Codemagic for a no-Mac setup
- You: Made the decisions, enrolled the company, paid fees, granted the AI access to the repository
- 2 Build
- AI: Drew design mock-ups and alternatives before coding; wrote features (new home screen, search, compare); converted the Android app to a shared KMP codebase; wrote Gradle, Xcode and
codemagic.yamlconfig; committed to GitHub in small, described commits - You: Chose designs, pulled each change, ran it in Android Studio, reported errors back with screenshots
- AI: Drew design mock-ups and alternatives before coding; wrote features (new home screen, search, compare); converted the Android app to a shared KMP codebase; wrote Gradle, Xcode and
- 3 Test
- AI: Wrote the test and upgrade checklists; read error screenshots, Logcat and build logs; added temporary diagnostic logging to find a release-only bug, then removed it
- You: Ran the builds on the emulator and real devices, followed the checklists, confirmed fixes
- 4 Google Play
- AI: Gave step-by-step Play Console guidance; wrote the store description, short description and release notes; generated phone and tablet screenshots; advised on declarations such as AI-generated content
- You: Built and signed the bundle with their own keystore, uploaded, clicked Send for review
- 5 App Store
- AI: Set up the Codemagic workflows (build check, screenshots at the exact size, TestFlight upload); wrote the App Store text, privacy answers and the review notes; drafted the response when Apple asked for more information
- You: Created records in App Store Connect, connected the API key, recorded the screen video on a real iPad, submitted
- 6 Launch
- AI: Wrote the smart-link redirect, the QR code and print card, the store-badge shortcode, and announcement drafts
- You: Installed the snippets on the website, chose what to publish
- 7 Updates
- AI: Bumped versions, merged branches, wrote release notes; also built automations that keep the app’s content fresh (news digest, a weekly review-refresh workflow with approval)
- You: Approved changes, built and submitted releases
What worked best when working with the AI:
- Share the real evidence. A screenshot of the error, the full log or the exact dialog solved most problems in one round; descriptions alone did not.
- Ask for options and a mock-up first. Seeing three design or architecture options before any code saved rework.
- Go one step at a time. Ask for the next step, do it, report back. Long instruction lists invite skipped steps.
- Give it the repository, keep the secrets. The AI committed code directly, but never held keystores, passwords or store logins. Those stayed with the human.
- Review and test every change yourself. Pull, build and run before you accept it; the AI cannot see your device.
- Ask “why” and “what’s next”. Asking it to explain a step, or what it would do next, surfaced risks early (for example testing the upgrade path, not just a fresh install).
- Check facts that change. Store rules, prices and screenshot sizes change; ask the AI to check current documentation rather than rely on memory.
- Keep a human gate on anything public. Store text, review notes and posts were AI-drafted but human-approved before they went out.
Phase 1: Prepare
Set up the business identity and accounts first; Apple’s checks are the slowest step and gate everything on iOS.
- Business entity. Publish under your company, not a personal name. Both stores show the publisher name publicly.
- D-U-N-S number. Apple requires one for an organisation account. Look up your company first; if none exists, request it free through Apple’s D-U-N-S lookup. Allow days to weeks, and use the exact legal name and address everywhere.
- Google Play developer account (one-off fee). Register as an organisation, verify identity, and set up the payments profile.
- Apple Developer Program (annual fee). Enrol as an organisation with the D-U-N-S number. Approval email = ready.
- Tools on the laptop.
- Android Studio (with Git configured: set the Git executable path if it isn’t found)
- A GitHub account and a private repository
- A Codemagic account linked to GitHub (cloud Macs for iOS builds)
- An AI assistant that can read and commit to the repository
- Store-side records.
- Play Console: create the app and choose the package name, for example
com.yourcompany.app(it can never change). - App Store Connect: create the app with the same bundle ID, name, SKU and primary language.
- App Store Connect API key for Codemagic (Users and Access → Integrations), saved in Codemagic as an integration.
- Play Console: create the app and choose the package name, for example
- Testers. Add every Apple ID you test with (including family devices) as a team user and internal TestFlight tester.
How AI helped
- Explained each store’s requirements in plain terms and turned them into a checklist with lead times, so the slow items (D-U-N-S, Apple enrolment) started first.
- Compared build approaches against the real constraints (an existing Android app, no Mac, one person) and recommended one shared codebase with cloud iOS builds.
- Answered every “what does this screen want?” question during enrolment, from screenshots.
Try this prompt: “I have an Android app written in Kotlin and only a Windows laptop. What’s the best way to also publish it on the App Store? Compare the options, costs and effort, and recommend one.”
Phase 2: Build
Write each feature once in the shared module; only a thin layer is platform-specific.
shared/commonMain: All screens (Compose), navigation, view models, repository, Room database, Ktor network calls, theme (nothing platform-specific).shared/iosMain: iOS app container, notification scheduling, share sheet,MainViewController(platform-specific: iOS notifications, file paths, SQLite driver).app(Android):MainActivity, Android platform hooks, WorkManager reminders, keystore signing (platform-specific: android permissions, dynamic colour).iosApp: Xcode project, Swift entry point, Info.plist, app icon (platform-specific: notification taps, version number).
How the pieces connect:
- One root composable is the single entry point both platforms call.
- Anything that differs per platform goes through a small
PlatformHooksinterface (reminders, sharing, colours), or anexpect/actualpair (HTTP engine, back handling). - Images load through one explicitly configured image loader, so release builds keep working.
Working routine:
- Work on a feature branch; merge into
masterwhen tested.masteris the release branch for both stores. - Commit small, logical changes with clear messages.
- After every pull: Sync Now in Android Studio.
- Before a store release, bump the version numbers (see Phase 7).
How AI helped
- Produced design mock-ups and two or three alternatives before any code, so design decisions were cheap.
- Wrote the features and the whole Android-to-KMP conversion, including Gradle, Xcode and Codemagic configuration, and committed them to GitHub in small, described steps.
- Fixed build errors from pasted screenshots and logs, and explained each fix.
- The human chose designs, pulled every change, ran it, and reported back what they saw.
Try this prompt: “Before writing code, show me three alternative designs for the home screen as mock-ups. Keep the current colours and explain the trade-offs.”
Phase 3: Test
Test the release build, not just the debug build: code shrinking (R8) can break things that work in debug, as it did with images in one of our releases.
- Debug run on the Android emulator: every screen, search, each core feature, sharing, saving, notifications.
- Release build test. Build a signed release APK, install it on the emulator, and repeat the checks. Confirm the emulator has internet first.
- Upgrade test. Install the current store version, add saved items and settings, then install the new build over it. Saved data, settings and images must survive. This catches database migration mistakes before users do.
- iOS simulator build with the Codemagic
ios-build-checkworkflow: proves the shared code compiles for iOS. - Real iPhone or iPad through TestFlight: install with the TestFlight app and run the same checks, including the notification prompt and a notification tap.
Checklist for each release:
☐ Every main screen loads, with images
☐ Search returns results from every content type
☐ Each core feature works end to end
☐ Saving and sharing work
☐ Daily reminder turns on and the permission prompt appears
☐ Offline launch shows cached content
☐ Upgrade from the previous version keeps data
How AI helped
- Wrote the release checklist and the upgrade test, and explained why the upgrade path matters (database migrations).
- Diagnosed failures from Logcat output and screenshots. For a release-only image bug, it added temporary diagnostic logging, read the result, fixed the cause, then removed the logging.
- Told the human exactly what to tap and what to look for, one step at a time.
Try this prompt: “Images load in the debug build but not in the release build. Here is the Logcat output filtered by ‘coil’. What’s the cause and the smallest fix?”
Phase 4: Release on Google Play
Android releases are built locally in Android Studio and uploaded as a signed App Bundle; review usually takes hours to a couple of days.
First release only
- Create the upload keystore (
.jks) the first time you build a signed bundle. Store the file and both passwords in a password manager, with a backup copy. Never commit it to GitHub. - Complete the Play Console setup tasks: app access, ads, content rating, target audience, data safety, AI-generated content declaration, privacy policy URL.
- Store listing: app name, short description (80 characters), full description, app icon (512 × 512), feature graphic, phone and tablet screenshots.
Every release
- In Android Studio, check out
masterand Git -> Pull, then Sync Now. - Confirm
versionCode(+1 every release) andversionNameinapp/build.gradle.kts. - Build -> Generate Signed App Bundle or APK -> Android App Bundle, same keystore, release, Create.
- Check
app/release/app-release.aabhas today’s timestamp. - Play Console -> Test and release -> Production -> Create new release, upload the
.aab, confirm it shows the new version (for example3 (1.2)). - Paste release notes in an
<en-AU>block, Next -> Save. - Publishing overview -> Send changes for review.
- After approval, update your own phone from the Play Store and check the version under About this app.
Updates reach phones gradually. If a phone doesn’t see it, open the app’s Play page, or clear the Play Store cache.
How AI helped
- Wrote the store listing: app name options, a short description within 80 characters, the full description and each release’s notes.
- Generated phone and tablet screenshots of the real app screens at the sizes Play asks for.
- Walked through each Play Console form (data safety, content rating, AI-generated content declaration) and explained what to answer.
- The human kept the keystore and passwords, built and signed the bundle, and pressed Send for review.
Try this prompt: “Write a Google Play short description under 80 characters and a full description for this app. Lead with the benefit, then list the main features.”
Phase 5: Release on the App Store
iOS builds run on Codemagic’s cloud Macs, so no Mac is needed; the slow parts are App Store Connect paperwork and Apple’s review.
Build and get it onto a device
- Push the tested code to
masteron GitHub. - In Codemagic, start the ios-testflight workflow. It signs the app with the App Store Connect integration, sets the build number, builds the
.ipaand uploads it to TestFlight. - The first time, fill in TestFlight Test Information (feedback email, contact details, phone in
+61format), or the upload to testers fails. - Open the TestFlight app on the iPhone or iPad, accept the invite (invites expire, so resend if needed), install and test.
App Store Connect: the version page
- The version number must match
MARKETING_VERSIONin the iOS project (rename the version, for example 1.0 to 1.1, if they differ). - Screenshots: 1206 × 2622 px for the “iPhone with Dynamic Island” slot. The
ios-screenshotsCodemagic workflow captures each screen using the-screenlaunch argument. - Promotional text, description, keywords, support URL, marketing URL.
- Build: select the TestFlight build. Encryption question is pre-answered (
ITSAppUsesNonExemptEncryption = false). - App Information: category, age rating, content rights.
- App Privacy: declare data collection (an app with no accounts and no tracking can declare that no data is collected).
- App Review Information: contact details and Notes. Include from the start:
- a screen recording on a real device, starting from launch
- purpose and target audience
- how to use the main features (no login needed)
- external services used (your content API, any AI services, payments or login providers)
- regional differences (none)
- Add for Review -> Submit.
If Apple asks for more information (Guideline 2.1), it isn’t a rejection of the app. Add what they ask for to the Notes, reply in the Resolution Center, and resubmit; no new build is needed.
How AI helped
- Wrote the Codemagic workflows that build, sign and upload the iOS app, and the one that captures App Store screenshots at the exact required size.
- Drafted the App Store promotional text, description, keywords and privacy answers.
- When Apple asked for more information, it turned Apple’s message into a recording script for the screen video and ready-to-paste review notes.
- Diagnosed each Codemagic or App Store Connect error from screenshots.
Try this prompt: “Apple returned ‘Guideline 2.1 – Information Needed’ (pasted below). Draft the App Review notes they ask for, and a step-by-step script for the screen recording.”
Phase 6: Launch and promote
One link on your own website, for example yourdomain.com/app, sends every visitor to the right store, so it can go on QR codes, slides and posts without changing later.
- Smart link. A small server-side redirect (a WordPress Code Snippet works) reads the device: iPhone and iPad go to the App Store, Android goes to Google Play (with a tracking referrer), and laptops see a page with both buttons.
- QR code pointing to the smart link, plus a printable QR card.
- Store badges on the site (a shortcode keeps them reusable), both set to the same height, for example 48 px.
- Before iOS approval: keep an “iOS live” switch off so iPhone users see “App Store – coming soon”.
- On approval day: turn the switch on and add the App Store badge link.
- Announce: a LinkedIn post, a message to your community and a short post on your website, each linking to the smart link.
- Link app and site: the app links to full content on your site; the site shows the badges on the homepage and in relevant articles.
How AI helped
- Wrote the smart-link redirect and the store-badge shortcode as ready-to-paste WordPress snippets, including the “coming soon” switch.
- Generated the QR code and a printable QR card.
- Drafted the launch post, community message and website announcement.
Try this prompt: “Write a WordPress snippet so that yourdomain.com/app sends iPhones to the App Store, Android phones to Google Play, and shows both buttons to everyone else.”
Phase 7: Ship updates
Every update follows the same loop: change once in shared, test both platforms, bump versions, release to both stores.
- Android
versionCode(app/build.gradle.kts): +1 every upload, never reused. - Android
versionName(app/build.gradle.kts): the version users see, for example 1.3. - iOS
MARKETING_VERSION(iosAppproject settings): same as Android’sversionName. - iOS build number (Set by Codemagic (
agvtool)): automatic, increases each build. - Database version (
AppDatabase): +1 with a migration whenever tables change.
Release checklist:
☐ Changes merged to master and pushed
☐ Version numbers bumped on both platforms
☐ Release-build and upgrade tests passed on Android
☐ TestFlight build tested on a real device
☐ Release notes written (same message for both stores)
☐ Android: signed .aab uploaded, sent for review
☐ iOS: new version created in App Store Connect, build selected, screenshots updated if screens changed, submitted
☐ After approval: install from each store and check the version
☐ Announce on LinkedIn and the community if the update is visible to users
How AI helped
- Bumps version numbers, merges the release branch and writes user-facing release notes from what changed.
- Runs the release checklist with you, one step at a time.
- Built automations that keep the app’s content current between releases: a daily news digest and a weekly review-refresh workflow that asks for human approval in Telegram before changing anything.
Try this prompt: “Summarise what changed since the last release into short, user-facing release notes I can use on both stores.”
Troubleshooting
Every problem below happened during a real two-store release; most came from stale local state or missing store paperwork, not the code. Each was solved by giving the AI the exact error, screenshot or log; it named the cause and the fix, usually in one round.
Problem: Installed APK still shows the old version
Why: An old APK file was installed.
Fix: Rebuild, check the file’s timestamp, reinstall.
Problem: Android Studio still shows the old version after a merge
Why: Local branch not pulled.
Fix: Git → Pull, then Sync Now.
Problem: “Local changes would be overwritten” on checkout or pull
Why: .idea/gradle.xml changed by the IDE.
Fix: Smart Checkout, or Rollback that one file, then pull.
Problem: “Git not found”
Why: Git path not set in Android Studio.
Fix: Settings → Version Control → Git, set the executable path.
Problem: Images missing in the release build only
Why: Code shrinking removed Coil’s network loader.
Fix: Configure the image loader explicitly; add keep rules for Ktor and Coil.
Problem: Images missing and UnknownHostException in Logcat
Why: The emulator had no internet.
Fix: Fix the emulator’s Wi-Fi, retest.
Problem: Build errors after moving files with IDE refactor
Why: Safe delete removed imports, or move conflicts.
Fix: Create files manually; untick Safe delete; re-add imports.
Problem: iOS compile error “‘val’ cannot be reassigned”
Why: Kotlin/Native needs setters on some iOS classes.
Fix: Use setTitle(...)-style setters.
Problem: Codemagic: TestFlight upload fails
Why: TestFlight test information missing.
Fix: Fill in Test Information (phone as +61…).
Problem: TestFlight invite doesn’t work
Why: Invite expired, or a different Apple ID on the device.
Fix: Resend; add that Apple ID as a team user and tester.
Problem: App Store screenshots rejected on upload
Why: Wrong pixel size.
Fix: Resize to 1206 × 2622.
Problem: No matching version in App Store Connect
Why: Store version (1.0) didn’t match the app (1.1).
Fix: Rename the version.
Problem: Apple: “Guideline 2.1 – Information Needed”
Why: Review notes too thin.
Fix: Add screen recording + the requested details to Notes, resubmit.
Problem: Phone doesn’t get the Play update
Why: Gradual rollout, Play Store cache.
Fix: Open the app’s Play page, clear Play Store cache, or wait a day.
Tips and best practices
The biggest time savers were starting the slow paperwork early, testing the release build, and keeping one source of truth for code and versions.
Planning
- Start the D-U-N-S and Apple enrolment on day one; they take the longest and can’t be rushed.
- Decide the package/bundle ID once (
com.yourcompany.app); it can never change after the first upload. - Keep a single shared codebase from the start. Porting Android-only code to iOS later cost more than building shared would have.
Security and accounts
- Back up the upload keystore and passwords in two places. Losing it means a Play support process to reset the key.
- Never commit keystores, API keys or
.envfiles. Keep secrets in Codemagic and n8n credentials. - Publish as the company, with a company support email (for example support@yourcompany.com), not a personal one.
Building
- Pull and Sync before every build; most “it still shows the old version” problems are stale local copies.
- Commit small and often, with clear messages; merge to
masteronly what’s tested. - Change the database schema only with a version bump and a migration.
Testing
- Always test the release build, and the upgrade from the live version.
- Test on a real device through TestFlight before submitting to Apple; Apple reviews on real devices.
- When something fails, read Logcat or the Codemagic log for the first real error before changing code.
Store submissions
- Treat the store listing as marketing: screenshots of real screens, a clear first line, benefits before features.
- Write App Review notes as if the reviewer knows nothing: purpose, how to use it, services, regions. Add a screen recording from day one.
- Keep release notes short and user-facing, and use the same message on both stores.
- Submit Android and iOS updates together so users on both see the same features.
After launch
- Use one smart link (
/app) everywhere; never print a store-specific URL on a QR code. - Install from the store yourself after each release to confirm what users get.
- Watch reviews and crash reports in both consoles in the first week after each release.
Release fact sheet (fill in for your app)
Keep these values in one place; almost every release step asks for one of them.
- Package / bundle ID:
com.yourcompany.app - App Store name: ___
- App Store app ID: ___
- App Store SKU: ___
- Repository and release branch: ___
- Codemagic workflows: build check · screenshots · TestFlight
- Codemagic App Store Connect integration: ___
- Android output:
app/release/app-release.aab - App Store screenshot size: 1206 × 2622 px
- Content API: ___
- Smart app link: ___
- Google Play link:
play.google.com/store/apps/details?id=<package> - App Store link:
apps.apple.com/app/id<app ID> - Keystore location (not the password): ___